The sim offers a scenario editor in which you can manually create warring sides and add bases, other facilities, ships, aircraft, and more. The editor makes it easy to build, and you may benefit from the considerable number of items that have been pre-built by the community.
The Lua scripting engine that is built into the game to control behaviors or add entities to the game, which is another good choice for building scenarios. Lua itself is a scripting language that shows up in games, and is often other software; the Wireshark packet-capturing and analysis program also has it embedded. The Lua functionality in CMANO allows you additional flexibility, especially for features or custom behaviors that are not already built into the game.
1. You need to get the entities into the game, so they look something like this when the scenario is built:
2. So you need to add them through the Lua console, which looks like this, with the pasted Lua commands in the lower frame:
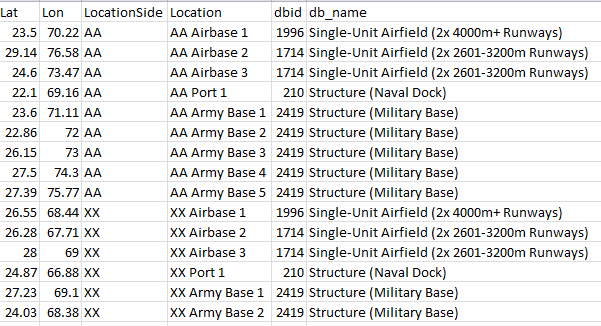
3. It would take hundreds or thousands of commands to populate even a medium-sized scenario this way, so if you already have a database and could export tables full of data, we could transform the tables into Lua commands that build all these units. The database dump would give us names of units (like airfields, ships, and aircraft squadrons) and locations, but we would need to add information and formatting so CMANO can properly insert each unit. In the example below, we have a "Location," which is actually a base, with its corresponding latitude and longitude. "AA" and "XX" are the two competing factions in the "LocationSide" column. However, to create an entity in the game, we need a CMANO database id. For example, by browsing the database viewer within the game, I discovered that "Structure (Military Base)" has ID 2419, and we will need that ID in our Lua command so CMANO can insert the correct facility type into the game. The user provides the rest from the data dump.
The resulting Lua command for the first base in the table above would be:
ScenEdit_AddUnit({side='Blue', type='facility', name="AA Airbase 1", dbid=1996, latitude='23.500000', longitude='70.220000'})
(See the link at the end of this posting for a list of all command formats.)
4. We could create a similar Lua command for every base, aircraft, ship, submarine, etc., in the game. My colleague did a similar thing in Visual Basic for Applications, and I wanted to try it out in Python, with the use of several lookup tables to make it easy to repeatedly export data and make the conversions. I used several lookup tables to map raw database entities to items that CMANO needs to function.
 |
| forces.csv |
 |
| forces_dbid.csv |
In this example, the forces.csv on the left lists the actual units to be inserted. the Python script joins it with the forces_dbid.csv lookup table and adds the database ID, or dbid, to the "forces" table wherever there is a matching UnitName. This is like a typical database join, but Pandas data frames allow us to use the Merge() method to achieve this.
Once the tables are properly joined, we end up with several tables that have all the required information. The script then processes each row in these tables, building Lua commands from the supplied parameters, and writing all the individual Lua commands to a text file. The user can then just open the file, copy those commands into the Lua script console within the game, and see the units appear on the map, as shown in the first image above.
It is important to note that you must process the facilities and ships before the aircraft, since aircraft are assigned to either bases or aircraft carriers, rather than latitudes and longitudes. So, the first fighter squadron in the table below gets planted on "AA Airbase 1," but only if that airbase already exists. Otherwise, there will be an error.
This is due to the format of the command to add an aircraft:
ScenEdit_AddUnit({side='Blue', type='aircraft', name="AA Fighter Squadron 1 #1", dbid=856, loadoutid=5270, base="AA Airbase 1"})
We have the choice of supplying an altitude, latitude, and longitude for flying aircraft, or for parked aircraft, we just name the base, as in the previous example.
(See the full formatting rule at https://commandlua.github.io/index.html#NewUnit)
If you wish to try it out or examine the approach, I have posted the code and some input files at https://github.com/mbondpro/commandlua . It may be easiest to run this by downloading Anaconda, a Python distribution that bundles the interpreter with Pandas and other data science packages. The main class is CmdData, and the commandLua.py file shows a typical loading and transformation sequence.
To learn more about CMANO, see here: http://www.warfaresims.com/
To learn more about Lua commands in CMANO, see here: https://commandlua.github.io/


